Deploying Java EE Microservices on OpenShift
I blogged about the simple JAX-RS microservice with WildFly Swarm yesterday. You learned how to build a so called "fat-jar" with Maven and also used the Maven Docker plugin to dockerize our microservice and run it locally on Docker Machine. This was a nice way to test things locally. What was missing so far is to put this into production. Let's look what steps are necessary to run yesterdays example on OpenShift Origin.
Why Should An Enterprise Java Developer Care?
But first of all, let's briefly look into why an Enterprise Java developer should even care about all of this. There is something about the recent hypes and buzzes, that let me wonder a bit. For sure, they make an interesting playing-field and you can spend hours of downloading container images and running them on your laptop. But bringing them into production was a challenge so far. Nigel has a really nice blog-post up about a deprecated feature in Docker. And it has another gem in it: A paragraph called: "Enterprise Impact". The main quote is:
And I can absolutely second that. Enterprise Developers, Architects and Project Managers are taking a much slower and conservative approach to adopting all those technologies. And they are looking for ways to successfully manage infrastructures and projects. All those technologies will find their way into our daily work life, but they will come in a more manageable way. So, we're just doing our homework with educating ourselves about all of this and evaluating solutions that will help us with that. But enough of general thoughts; Let's start to deploy and scale a Java EE application.
Prerequisites
Install and run OpenShift Origin and follow the steps to build a WildFly Swarm JAX-RS Microservice in a Docker Container. Because this is the example, I'm going to deploy and scale further on.
(NOTE: I am using both, the all-in-on-vm from the OpenShift project and the Vagrant image delivered by the Fabric8 project interchangeable. They work pretty much the same and both rely on OpenShift Origin. If you see URLs ending on .f8, e.g. https://vagrant.f8:8443 in one of the codes or examples, you can use localhost or other host-mappings interchangeable. )
What Is OpenShift Origin?
OpenShift Origin is the upstream open source version of Red Hat's distributed application system, OpenShift. We launched this project to provide a platform in which development teams could build and manage cloud native applications on top of Docker and Kubernetes. You can find the source code on Github and we know you've got great ideas for improving OpenShift Origin. So roll up your sleeves and come join us in the community.
There is a lot to know to master all the integrated technologies. But the community is working hard to make this as understandable and manageable as possible for us, the enterprise Java developers. To give you a brief overview of OpenShift, this is a simple diagram of how everything works:

You see a lot of common parts here, if you've been following the latest buzz around Docker and Kubernetes. A request comes in via a client and ends in the routing layer. It get's dispatched to a service and hit's a pod which is running one of our Docker images in a container. The pods are controlled by replication controllers. There is a lot more to it, of course, but this should be all you need to understand for now to get a first idea about the whole thing.
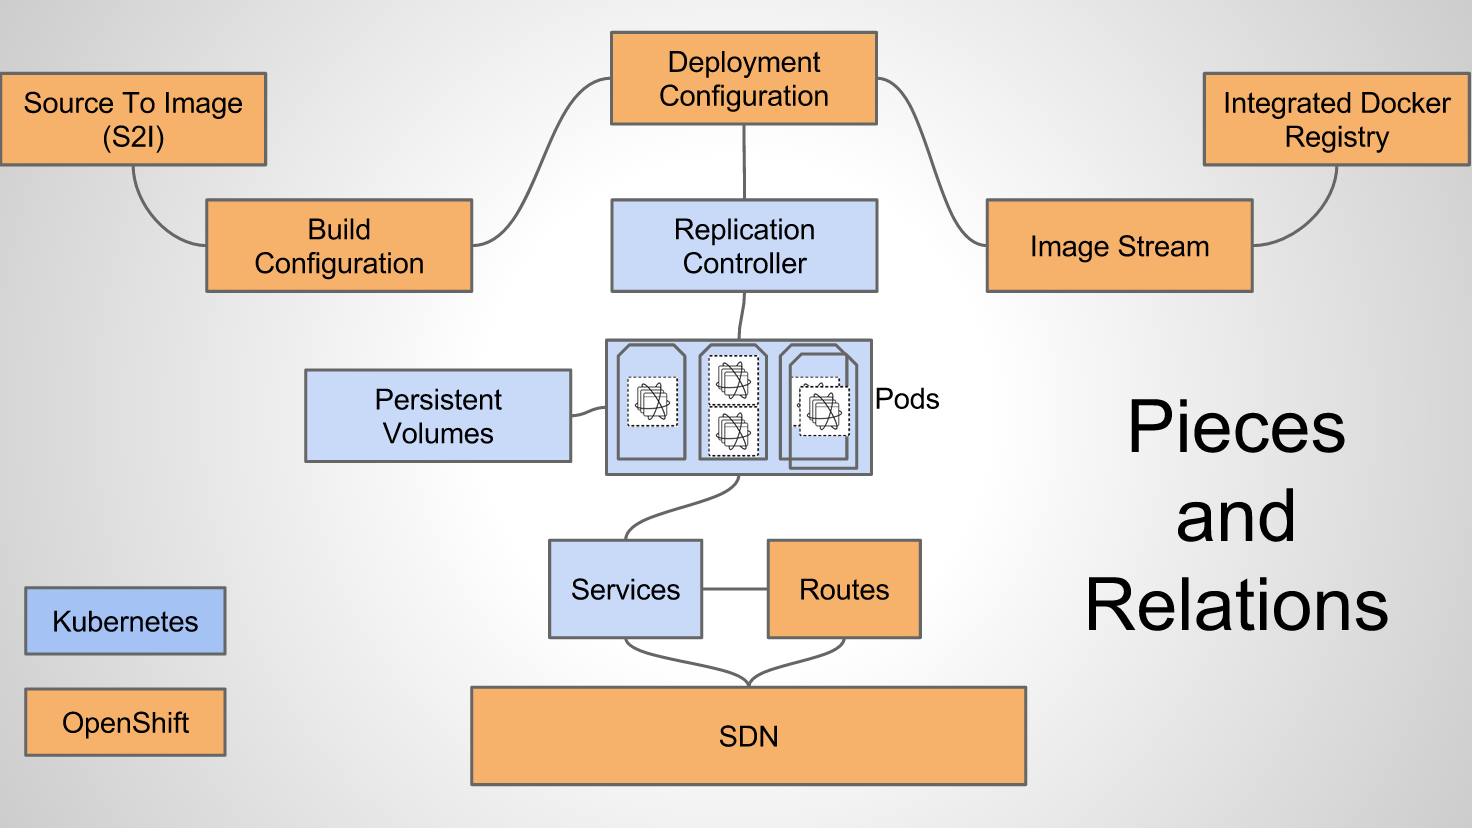
Another, more detailed overview gives you a more precise idea about the parts, that we are going to work with today.

Especially the integrated Docker registry, the image stream, deployment configuration and routing to our services are of interest for now.
The Basics - Administration UI and Client Tools
After you setup your vagrant box and have fired it up, you can access the web-based administration by browsing to: https://localhost:8443. The all-in-one-vm comes without configured security. This means, that the "Allow All" identity provider is used. You can login with any non-empty user name and password. The "admin" user is the administration user with all rights. Login in with "admin/admin" gives you full power on Origin. The web-based administration is good for looking at logfiles and the overall picture. It is (not yet) fully featured and doesn't allow you to tweak or change things. First and foremost, you need to use the command line tool: "oc". And similar to the web-adminstration, you also have to login to OpenShift:
Exposing the Internal Docker Registry
If we want to run a dockerized application in OpenShift, which isn't available in the docker-hub, we need to push it to the OpenShift Docker Registry. By default it isn't externally exposed, so first thing to do is to expose the build in OpenShift Docker Registry via a Route.
Let's create a new project for our example. Because of namespace reasons, we will name the project exactly after the user and image name: In this example, "myfear".

Let's create a user "myfear" by simply logging in as:
Tweaking The Example
We need to change some parts of the pom.xml from yesterdays example. First of all, we need to tell the Docker Maven Plugin, that it should use a private registry running at registry.vagrant.f8:80. Wondering, why this isn't port 5000? Because, we exposed the service via OpenShift and the HAProxy did it via port 80. Uncomment the two lines in the pom.xml:
Build And Push The Image
The image has been build in my earlier blog-post already, but let's just do it again here:
Run A Docker Image On OpenShift
Now we just use the regular way to spin up a new Docker image on OpenShift:
Browse to: http://wildfly-swarm.vagrant.f8/rs/customer and see the output:
Next up in this series is scaling and load-balancing our little example. Stay tuned for more! Have questions, or ideas about more Java EE and Docker and OpenShift? Please let me know and follow me on Twitter @myfear
Why Should An Enterprise Java Developer Care?
But first of all, let's briefly look into why an Enterprise Java developer should even care about all of this. There is something about the recent hypes and buzzes, that let me wonder a bit. For sure, they make an interesting playing-field and you can spend hours of downloading container images and running them on your laptop. But bringing them into production was a challenge so far. Nigel has a really nice blog-post up about a deprecated feature in Docker. And it has another gem in it: A paragraph called: "Enterprise Impact". The main quote is:
"I’m sure doing this kind of stuff is done all the time in cool hipster companies [...] But it’s absolutely not done in rusty old enterprises [...]".
(Nigel Poulton)
And I can absolutely second that. Enterprise Developers, Architects and Project Managers are taking a much slower and conservative approach to adopting all those technologies. And they are looking for ways to successfully manage infrastructures and projects. All those technologies will find their way into our daily work life, but they will come in a more manageable way. So, we're just doing our homework with educating ourselves about all of this and evaluating solutions that will help us with that. But enough of general thoughts; Let's start to deploy and scale a Java EE application.
Prerequisites
Install and run OpenShift Origin and follow the steps to build a WildFly Swarm JAX-RS Microservice in a Docker Container. Because this is the example, I'm going to deploy and scale further on.
(NOTE: I am using both, the all-in-on-vm from the OpenShift project and the Vagrant image delivered by the Fabric8 project interchangeable. They work pretty much the same and both rely on OpenShift Origin. If you see URLs ending on .f8, e.g. https://vagrant.f8:8443 in one of the codes or examples, you can use localhost or other host-mappings interchangeable. )
What Is OpenShift Origin?
OpenShift Origin is the upstream open source version of Red Hat's distributed application system, OpenShift. We launched this project to provide a platform in which development teams could build and manage cloud native applications on top of Docker and Kubernetes. You can find the source code on Github and we know you've got great ideas for improving OpenShift Origin. So roll up your sleeves and come join us in the community.
There is a lot to know to master all the integrated technologies. But the community is working hard to make this as understandable and manageable as possible for us, the enterprise Java developers. To give you a brief overview of OpenShift, this is a simple diagram of how everything works:

You see a lot of common parts here, if you've been following the latest buzz around Docker and Kubernetes. A request comes in via a client and ends in the routing layer. It get's dispatched to a service and hit's a pod which is running one of our Docker images in a container. The pods are controlled by replication controllers. There is a lot more to it, of course, but this should be all you need to understand for now to get a first idea about the whole thing.
Another, more detailed overview gives you a more precise idea about the parts, that we are going to work with today.
Especially the integrated Docker registry, the image stream, deployment configuration and routing to our services are of interest for now.
The Basics - Administration UI and Client Tools
After you setup your vagrant box and have fired it up, you can access the web-based administration by browsing to: https://localhost:8443. The all-in-one-vm comes without configured security. This means, that the "Allow All" identity provider is used. You can login with any non-empty user name and password. The "admin" user is the administration user with all rights. Login in with "admin/admin" gives you full power on Origin. The web-based administration is good for looking at logfiles and the overall picture. It is (not yet) fully featured and doesn't allow you to tweak or change things. First and foremost, you need to use the command line tool: "oc". And similar to the web-adminstration, you also have to login to OpenShift:
oc login https://localhost:8443
Authentication required for https://vagrant.f8:8443 (openshift)
Username: admin
Password:
Login successful.

Using project "default".
You have access to the following projects and can switch between them with 'oc project <projectname>':
  * default (current)
  * openshift
  * openshift-infra
Now you're ready for some administration in OpenShift.
Exposing the Internal Docker Registry
If we want to run a dockerized application in OpenShift, which isn't available in the docker-hub, we need to push it to the OpenShift Docker Registry. By default it isn't externally exposed, so first thing to do is to expose the build in OpenShift Docker Registry via a Route.
oc create -f registry-route.json
172.28.128.4 registry.vagrant.f8
set DOCKER_HOST=tcp://vagrant.f8:2375
Let's create a new project for our example. Because of namespace reasons, we will name the project exactly after the user and image name: In this example, "myfear".
oc new-project myfear --description="WildFly Swarm Docker Image on OpenShift v3" --display-name="WildFly Swarm Project"

Let's create a user "myfear" by simply logging in as:
c login https://vagrant.f8:8443 -u myfear
Tweaking The Example
We need to change some parts of the pom.xml from yesterdays example. First of all, we need to tell the Docker Maven Plugin, that it should use a private registry running at registry.vagrant.f8:80. Wondering, why this isn't port 5000? Because, we exposed the service via OpenShift and the HAProxy did it via port 80. Uncomment the two lines in the pom.xml:
<docker.host>tcp://vagrant.f8:2375</docker.host>
<docker.registry>registry.vagrant.f8:80</docker.registry>
$oc whoami -t
ykHRzUGGu-FAo_ZS5RJFcndjYw0ry3bskMgFjqK1SZkNow update the token in the <authConfig> element of the pom. That's basically it.
Build And Push The Image
The image has been build in my earlier blog-post already, but let's just do it again here:
mvn clean install docker:build
mvn docker:push
Run A Docker Image On OpenShift
Now we just use the regular way to spin up a new Docker image on OpenShift:
oc new-app --docker-image=myfear/swarm-sample:latest
oc describe service swarm-sample
Name:                   swarm-sample
Namespace:              myfear
Labels:                 app=swarm-sample
Selector:               app=swarm-sample,deploymentconfig=swarm-sample
Type:                   ClusterIP
IP:                     172.30.25.44
Port:                   8080-tcp        8080/TCP
Endpoints:              172.17.0.5:8080
Session Affinity:       None
No events.
The one thing, we're missing so far is the external mapping via a route. You recall what we did for the Docker Registry? This is the next and last step so far.
oc expose service swarm-sample --hostname=wildfly-swarm.vagrant.f8
172.28.128.4 wildfly-swarm.vagrant.f8And we're done. Why I didn't use a json file to create the route? Because I wanted to show you, that it can be easier, as long the image uses the correct EXPOSE definitions for the ports, the oc expose command does this job without having to mess around with json. It is the same result.
Browse to: http://wildfly-swarm.vagrant.f8/rs/customer and see the output:
{"text":"WildFly Swarm Docker Application on OpenShift at http://wildfly-swarm.vagrant.f8/rs/ - Hostname: swarm-sample-1-7mmd7"}
The hostname is the pod, on which our container is running on.Next up in this series is scaling and load-balancing our little example. Stay tuned for more! Have questions, or ideas about more Java EE and Docker and OpenShift? Please let me know and follow me on Twitter @myfear

Post a Comment